JLB Exchange Email Setup for Android
In order to use ActiveSync make sure this service is enable for your account. Click here for instructions on how to enable ActiveSync service.
Step 01
On the Smart Phone device, look for and select “Settings” – “Accounts and Sync” – “Add Account.”
Step 02
Choose any of these you may find (depending on the device, the choices will differ): “Corporate” or “Microsoft Exchange” or “Active Sync.”
Step 03
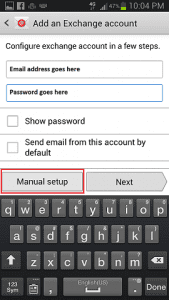
On the first Exchange Account screen, enter your email address and password:
Step 04
Click Next.
NOTE: If the account does not automatically configure, you will need to click Manual setup.
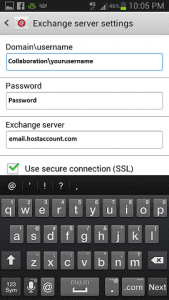
Step 04.1
For this screen, enter the following parameters:
For this screen, enter the following parameters:
a. Domain: COLLABORATION (If the name of the field is Domain\Username, then enter: “collaboration\” followed by the username (see the next step to help you determine your username).
b. Username: Enter your Windows Domain username found in the Control Panel (https://cp.emmcloud.com) under the mailbox you need to setup. NOTE: Some devices have two separate fields for the domain and username information. If this is the case for your device, enter the first part in the Domain field and the second part (after the slash) in the Username field.
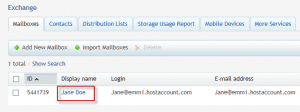
• How to find the Windows domain username: Select the Display name of the mailbox:
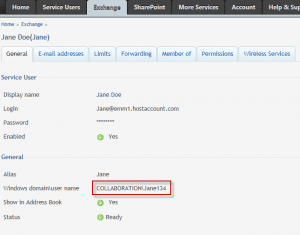
Step 04.2
Find the Windows domain username in the General section:
c. Server: email.hostaccount.com
d. Put a check mark to enable “Secure mail using SSL.”
e. Email: Your Exchange email address
f. Password: Your Exchange password
g. Select Next.
h. Choose what to synchronize and give a name to this account if asked. Save if you have an option.
i. The first time your device syncs you may receive the prompt wanting to enforce security policies on your device. Select OK or allow to proceed and synchronize your device.